Lab 11: Counter-Controlled Loops
Pull and Update in VS Code
Before starting any lab, you need to make sure that the repo in your GitHub is the latest one. Sync the repo if the upstream repo have been updated.
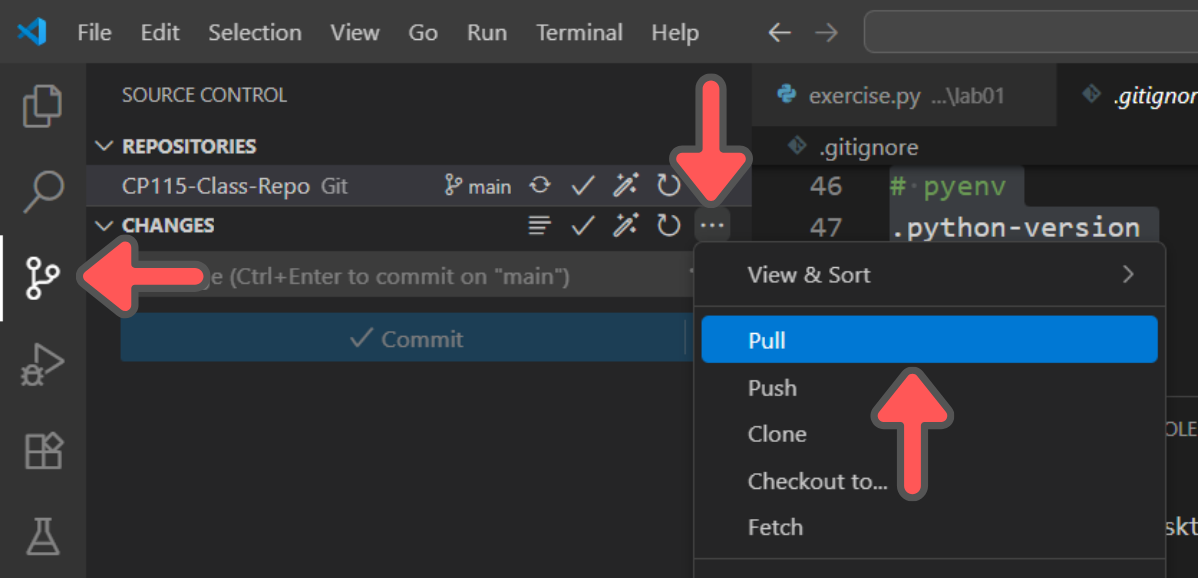
Once the online repo is in-sync, bring those changes down to your PC by clicking Source Control and then ... beside Changes and click Pull.
Counter-Controlled Loops
When you know how many times you need to repeat something, you use counter-controlled loops. Python gives you two main ways to handle this: for loops with range() and while loops where you manage the counter yourself.
Launch VS Code and open the exercise.py file in /labs/lab11/.
For Loop with Range
Understanding the Basic Need
You often need to repeat actions a specific number of times. Consider printing 10 receipts, calculating monthly payments over 24 months, or processing exactly 30 student records. The key characteristic here is that you know the exact count before starting.
Without loops, you'd have to write repetitive code like this:
# The hard way - writing everything manually
print("Receipt #1 printed")
print("Receipt #2 printed")
print("Receipt #3 printed")
print("Receipt #4 printed")
print("Receipt #5 printed")
This approach has serious problems. What if you need 100 receipts instead of 5? You'd have to write 100 lines of nearly identical code. What if the number of receipts comes from user input? You'd need a different program for every possible count.
Copy this simple example into your exercise.py file:
# The smart way - let Python count for you
print("Printing 5 receipts:")
for receipt_number in range(5):
    print(f"Receipt #{receipt_number + 1} printed")
Run this code. Notice how receipt_number automatically goes from 0 to 4, but we display it as 1 to 5 for users. Python handles all the counting logic - you don't need to manually increment anything or check when to stop. The for loop replaces those 5 separate print statements with just 2 lines of code.
Range Function Basics
The range() function controls how Python counts for you. It has three different forms depending on how much control you need.
Start with the simplest form - just telling Python where to stop:
# Single parameter: range(stop)
print("Basic range counting:")
for count in range(4):
    print(f"Count: {count}")
Add this to your file and run it. You get 0, 1, 2, 3. The range always stops before the number you specify.
This might seem odd at first - why does range(4) give you 4 numbers (0, 1, 2, 3) but stops at 3? Python uses this "stop-before" approach because it makes many programming tasks easier. When you want to process 4 items in a list, range(4) gives you the exact indices you need: 0, 1, 2, 3. When you want to repeat something 4 times, range(4) gives you exactly 4 iterations.
Now try specifying both start and stop points:
# Two parameters: range(start, stop)
print("Custom start and stop:")
for number in range(10, 15):
    print(f"Number: {number}")
This gives you 10, 11, 12, 13, 14. Much more useful when you want to start counting from a specific number. Notice it still stops before 15, just like the single parameter version stopped before the specified number.
The format is range(start, stop) where:
- start: the first number you want (included)
- stop: where to stop counting (excluded - not included)
The third form lets you control how much to count by:
# Three parameters: range(start, stop, step)
print("Counting by 3s:")
for value in range(0, 12, 3):
    print(f"Value: {value}")
Run this and you'll see 0, 3, 6, 9. The step parameter tells Python how much to add each time. Instead of adding 1 (the default), it adds 3.
The format is range(start, stop, step) where:
- start: the first number you want (included)
- stop: where to stop counting (excluded - not included)
- step: how much to add each time (increment)
Try this counting by 5s example:
# Counting by 5s
print("Counting by 5s:")
for value in range(0, 25, 5):
    print(f"Value: {value}")
This gives you 0, 5, 10, 15, 20. Perfect for things like counting money in RM5 notes or scheduling events every 5 minutes.
Practical For Loop Applications
User-Determined Counting
Sometimes the number of repetitions comes from user input, but you still know the count before the loop starts:
# Count determined by user input
team_size = int(input("How many team members? "))
print(f"Registering {team_size} team members:")

for member in range(1, team_size + 1):
    name = input(f"Enter name for member {member}: ")
    print(f"Member {member}: {name} registered")

print("Team registration complete!")
The crucial point here is that once the user enters team_size, you know exactly how many times the loop will run. The for loop is perfect for this scenario.
Notice we use range(1, team_size + 1) instead of range(team_size). This is because we want to number the team members starting from 1, not 0. If the user says 3 team members, we want "Member 1", "Member 2", "Member 3" - not "Member 0", "Member 1", "Member 2". The + 1 is needed because range stops before the end number.
Calculation-Based Counting
The count might come from a calculation or mathematical formula:
# Count from calculation
months_in_year = 12
years = 3
total_months = months_in_year * years

print(f"Monthly report for {years} years:")
for month in range(1, total_months + 1):
    year_number = (month - 1) // 12 + 1
    month_in_year = (month - 1) % 12 + 1
    print(f"Month {month}: Year {year_number}, Month {month_in_year}")
Here, total_months determines how many monthly reports we generate. Each iteration uses the month counter to calculate which year and month we're processing.
The power of this approach is that you can change years to any value - 5, 10, 20 years - and the same code works. The calculations (month - 1) // 12 + 1 and (month - 1) % 12 + 1 automatically figure out which year and which month within that year we're currently processing.
Using Counter Values in Calculations
The counter variable isn't just for counting - you can use its value in your calculations:
# Counter used in calculations
print("Multiplication table for 7:")
for multiplier in range(1, 11):
    result = 7 * multiplier
    print(f"7 x {multiplier} = {result}")
The multiplier variable serves dual purposes: it counts from 1 to 10, and it's also the number we multiply by 7.
While Loop with Counter
When For Loops Aren't Sufficient
The for loop works great when you need straightforward counting, but sometimes you need more control. Consider these scenarios: the counting increment needs to change based on data you process, you need to coordinate multiple counters, or the counter update logic is more complex than simple addition.
Think about a video game where players advance levels at different rates. A skilled player might skip levels, while a struggling player moves up slowly. Or consider a business process where you handle different numbers of items based on their priority. These situations require more flexible counter management than a for loop can provide.
The Three Essential Steps
With a while loop, you become responsible for managing the counter. This requires three steps that you must handle manually:
- Step 1: Initialize - Set the counter to its starting value
- Step 2: Condition - Check if the loop should continue
- Step 3: Update - Change the counter value for the next iteration
# Basic while loop counter pattern
attempt = 1                    # Step 1: Initialize
while attempt <= 3:            # Step 2: Condition
    print(f"Attempt number: {attempt}")
    attempt += 1               # Step 3: Update
Add this to your exercise.py and run it. The output looks similar to a for loop, but you control every aspect. The critical part is Step 3 - if you forget to update attempt, the loop runs forever.
These three steps mirror what the for loop does automatically. The for loop initializes the counter variable, checks if it should continue on each iteration, and updates the counter at the end of each loop. With a while loop, you write these steps explicitly, which gives you the power to modify any of them based on your program's needs.
Let's see why manual control matters:
# Counter increment varies
week = 1
while week <= 4:
    points = int(input(f"Week {week} points: "))

    if points >= 100:
        week += 2  # Skip ahead
    else:
        week += 1  # Normal progress
This example shows something impossible with a for loop - the counter increment changes based on the data processed within the loop.
Here's what makes this powerful: if someone scores 100+ points in week 1, they jump directly to week 3, skipping week 2 entirely. This kind of conditional advancement is common in real applications. Educational software might let students skip lessons they've mastered, or business software might fast-track priority orders through fewer approval steps.
Advanced Counter Scenarios
Coordinated Multiple Counters
Sometimes you need several counters tracking different aspects of your process:
# Multiple counters working together
day = 1
total_sales = 0
successful_days = 0

print("Daily sales tracking:")
while day <= 7:  # One week
    daily_sales = float(input(f"Day {day} sales: RM"))
    total_sales += daily_sales

    if daily_sales >= 1000:
        successful_days += 1
        print(f"Day {day}: Target achieved!")
    else:
        print(f"Day {day}: Below target")

    day += 1

print(f"Week summary: RM{total_sales} total, {successful_days} successful days")
Here, day counts the days, total_sales accumulates money, and successful_days counts achievements. Each serves a different purpose but they're all coordinated within the same loop.
Variable Step Counting
When your counter needs to follow non-standard patterns:
# Custom step pattern
level = 1
step = 1

while level <= 10:
    print(f"Level: {level}")
    level += step
    step += 1  # Increase step each time
The level counter increases by different amounts each iteration. First by 1, then by 2, then by 3, and so on. This kind of variable progression is natural with while loops.
Counter Safety
The main risk with while loop counters is creating infinite loops by forgetting the counter update:
# Safe counter practice
attempts = 0
while attempts < 5:
    print(f"Attempt {attempts + 1}")
    attempts += 1  # Never forget this!
Always place the counter update where it will execute every loop iteration. A common mistake is putting it inside a condition where it might be skipped.
Comparing Both Approaches
Let's solve the same task using both approaches:
Problem: Calculate sum of numbers from 1 to 5
# For loop approach
total = 0
for i in range(1, 6):
    total += i
print(f"For loop total: {total}")
The for loop is clean and direct. Now the while loop version:
# While loop approach
total = 0
current = 1
while current <= 5:
    total += current
    current += 1  # Manual update
print(f"While loop total: {total}")
Both produce identical results, but the while loop requires you to manage current manually. For this straightforward counting, the for loop is simpler. However, the while loop becomes valuable when you need the flexibility to modify the counter logic based on the calculations or data processed within the loop.
Exercise 1: Score Accumulator Task
Calculate running totals of game scores over multiple rounds. Each round, ask the user to input the round score, then add it to the total score. Use a for loop to process each round and track the cumulative score.
Process scores for a specified number of rounds. For each round, get the round score from user input, then add the round score to the running total. The challenge is calculating bonus points: if the round score is above 100, add a 20% bonus to that round's score before adding to the total.
Scoring Rules: Round score ≤ 100: Add score as-is, Round score > 100: Add score + 20% bonus
Example: Round 1: User enters 80 points → total = 80, Round 2: User enters 120 points → 120 + 24 bonus = 144 added → total = 224
Create /labs/lab11/exercise1/exercise1.py:
num_rounds = int(input())

# TODO: Your code here
# Use input() inside the loop to get each round's score

print(f"{final_score:.1f}")
print(rounds_processed)
Exercise 2: Temperature Monitor Task
Monitor daily temperatures and count how many days exceed a warning threshold. Each day, ask the user to input the temperature reading, then check if it exceeds the threshold. Use a for loop to process daily temperature readings and track temperature patterns.
Process temperature readings for a specified number of days. For each day, get the temperature from user input, then count how many days have temperatures above the danger threshold. Calculate the average temperature across all days.
Temperature Rules: Temperature > threshold: Count as danger day, Track all temperatures for average calculation
Example: Threshold 35°C, Day 1: User enters 32°C, Day 2: User enters 37°C (danger), Day 3: User enters 34°C, Day 4: User enters 39°C (danger): Danger days = 2, Average = 35.5°C
Create /labs/lab11/exercise2/exercise2.py:
num_days = int(input())
danger_threshold = float(input())

# TODO: Your code here
# Use input() inside the loop to get each day's temperature

print(danger_days)
print(f"{average_temp:.1f}")
Exercise 3: Point Accumulator Task
Build a point accumulation system that keeps adding points until reaching a target. The program repeatedly asks the user for points and adds them to a running total. Use a while loop that continues collecting points until the total meets or exceeds the target amount.
Your program should start with zero points and keep asking for more points from the user. After each input, add those points to your running total and check if you've reached the target. When the total finally reaches or goes over the target, stop the loop and display the results.
How it works: Start with total = 0, Ask user for points and add to total, Repeat until total ≥ target, Track how many times you asked for input
Example: Target is 100 points. User enters 30 (total = 30), then enters 45 (total = 75), then enters 35 (total = 110). Since 110 ≥ 100, stop. Result: 3 rounds played, final total = 110.
Create /labs/lab11/exercise3/exercise3.py:
target_points = int(input())

# TODO: Your code here
# Use input() inside the while loop to get points each round

print(total_points)
print(rounds_played)
Commit and Push Your Work
After completing all exercises, save all your files and commit them to your repository. Make sure your files are properly saved in the /labs/lab11/ directory, including exercise.py, exercise1.py, exercise2.py, and exercise3.py.
Use VS Code's source control panel to stage your changes, add a meaningful commit message like "Complete Lab 11: Counter-Controlled Loops with Exercises", and push your changes to GitHub. Check your repository online to ensure all files have been uploaded successfully.