Lab 01 : Tool Orientation (VS Code and GitHub)
This lab walks you through setting up Git and VS Code, then using their graphical interfaces to manage the class-cp115-repo on GitHub.
Install Git and VS Code
- Follow the Git installation guide for details on downloading and configuring Git.
- Follow the VS Code installation guide to install the editor.
- In VS Code, open the
Extensionspanel and install the Python extension from Microsoft.

Create a GitHub Account
GitHub is the online platform where we store and share all the code for this course. Before you can fork, clone, or push any code, you need your own free GitHub account.
Task- Open your browser and go to https://github.com/signup.
- Enter your email address. Use an email you check regularly so you can verify your account.
- Create a strong password and choose a username. This username is how others will see you on GitHub, so pick something clear and professional.
Once your account is created and verified, you are ready to continue.
Preparing Your Workspace Folder
Before working with GitHub, you need a place on your computer to keep your work. Keeping everything in one organized folder makes your files easy to find later.
TaskFirst, create a folder named after yourself on your Desktop:
- Go to your Desktop.
- Right-click on an empty area and choose
New→Folder. - Name the folder using your own name, for example
aiman-cp115.
Now open that folder in VS Code so it becomes your working area:
- Open VS Code.
- From the top menu, click
File→Open Folder.... - Browse to your Desktop, select the folder you just created, and click
Select Folder.
TIP
You can also open the folder directly by right-clicking it on the Desktop and choosing Open with Code.
Once the folder is open, you will see its name at the top of the Explorer panel on the left side of VS Code. This is where your cloned repository will live.
Install GitHub CLI
GitHub CLI (gh) is a command-line tool that brings GitHub directly into your terminal. In this course, we use it to authenticate your machine with GitHub so that pushing and pulling code works without entering your credentials every time.
In VS Code, open a terminal by clicking Terminal in the top menu bar, then selecting New Terminal. A terminal panel will appear at the bottom of VS Code.
Install GitHub CLI using winget:
winget install --id GitHub.cliOnce installed, close and reopen the terminal, then verify:
gh --versionYou should see a version number printed.
Logging In
Run the following command to authenticate with GitHub:
gh auth loginFollow the prompts:
- Select GitHub.com
- Select HTTPS
- When asked to authenticate, choose Login with a web browser
- A one-time code will appear in the terminal — copy it, press Enter to open the browser, paste the code, and authorise the app
Once done, verify you are logged in:
gh auth statusYou should see your GitHub username confirmed.
Setting Up Your Identity
Tell Git who you are for commit records. Replace USERNAME and EMAIL with your actual GitHub username and email:
git config --global user.name  "USERNAME"
git config --global user.email "EMAIL"
Forking the Repository
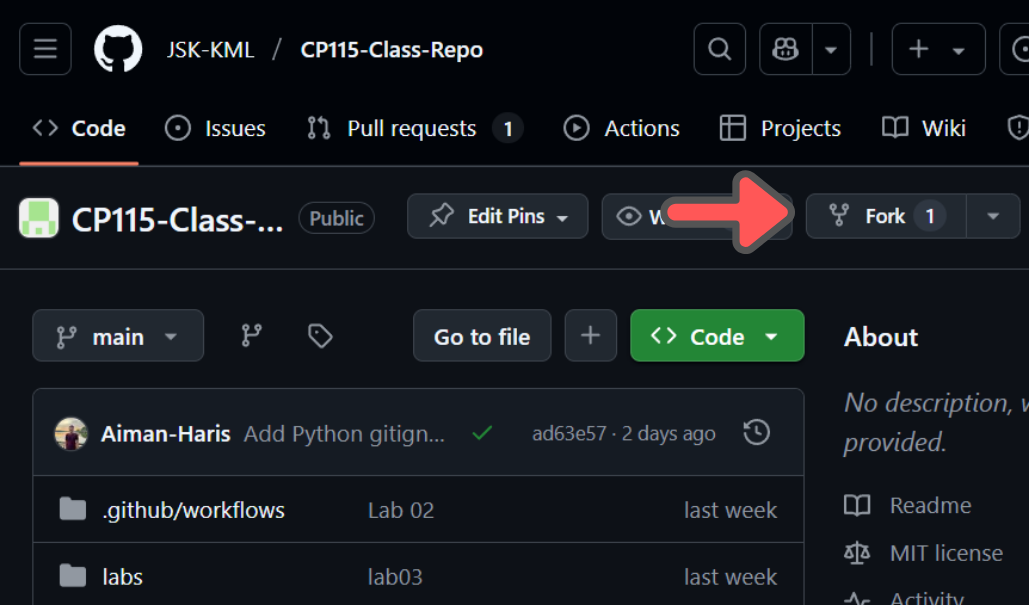
When you fork a repository on GitHub, you create a fully independent copy under your own account. The original owner keeps their version; you now control yours and can set permissions, open issues, or adjust settings without affecting the source project.
On GitHub, fork the class-cp115-repo from this link by clicking the Fork button in GitHub. Proceed to the fork, without changing any default options.
After you have done forking the repository, everything that you write is fully yours and only you can control it. So what is the difference between forking and simply copying?
The difference lies in the connection from the original copy. When you copy-paste something like a PDF documents, you have no connection to the original copy, meaning that if the original PDF changes, you will not know and you will not be notified.
For forking, there are still connections to the original repository, so if the original repository updates, you will be notified and you can update accordingly.
Cloning Your Repository
Now that you have done forking, the code is fully yours, but it only exists on GitHub web server. This is great, however, editing the code online, although feasible, is not a very smooth experience.
To solve this, we need to clone the repository into your computer so you can edit and run the code using your IDE, which in this class we have chosen VS Code.
In your class-cp115-repo, click Code and copy the link.
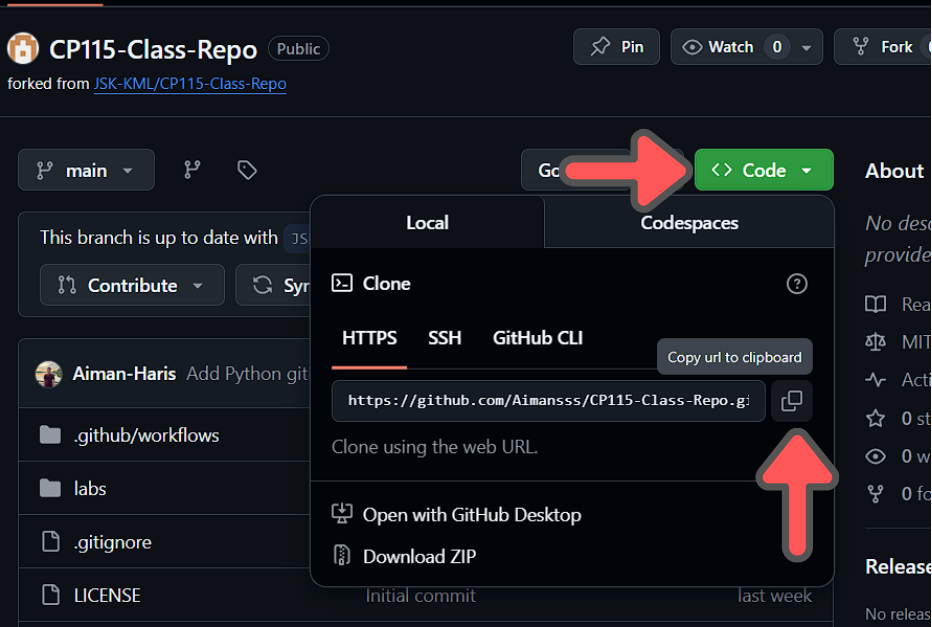
Back in VS Code, choose Source Control from the sidebar and click Clone repository and paste the link that you have copied in the box when prompted. Then choose Clone from URL.

Cloning Using the Terminal Optional
Instead of the graphical Source Control panel, you can also clone the repository using the terminal. This is the method most programmers use, and it is good to get familiar with it.
Open a terminal in VS Code by clicking Terminal and then New Terminal. A terminal will appear at the bottom of the window, already pointing at your workspace folder.
In the terminal, type the command below, replacing the link with the one you copied from the Code button on GitHub:
git clone https://github.com/YOUR-USERNAME/CP115-Class-Repo.gitPress Enter, and Git will download a full copy of the repository into a new folder inside your workspace.
TIP
Both methods do the same thing. The Source Control panel runs the git clone command for you behind the scenes.
After finishing that, your local copy is ready to use. If you have completed the GitHub CLI setup earlier, your machine is already authenticated and you are good to go.
Commit and Push
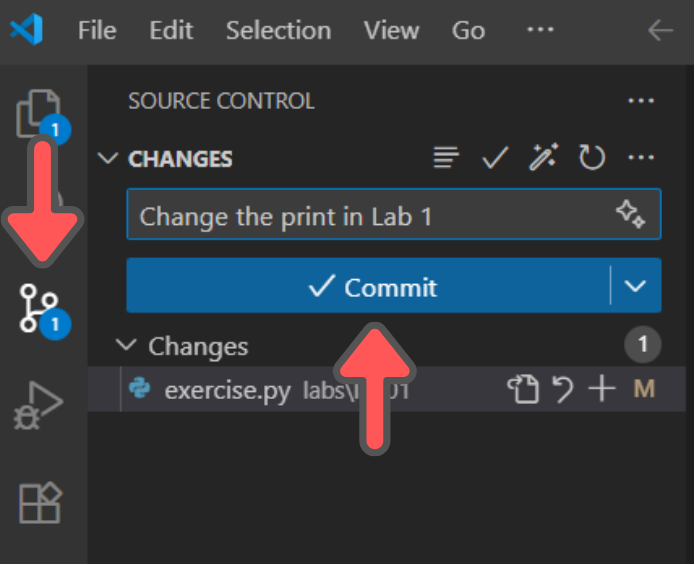
When you have finished cloning the repository, you will see that the folder and file on the computer is exactly like in the GitHub web. Now let's try to update our code. In labs/lab01/exercise.py, change the code from
print("Hello, Lab 01")to
print("Hello everyone, Lab 01")By changing the code, even if you add a space, VS Code will automatically detects the changes and will allow you to update the online repository that you have in GitHub.
On the sidebar, choose the Source Control and VS Code will automatically show you where the changes have been done. In the message box add appropriate message such as Change the print in Lab 1 and click Commit.
But what exactly is Commit? A commit records a snapshot of your changes in the local repository. Each commit carries a unique ID and a message explaining what changed, letting you roll back or review history at any point.
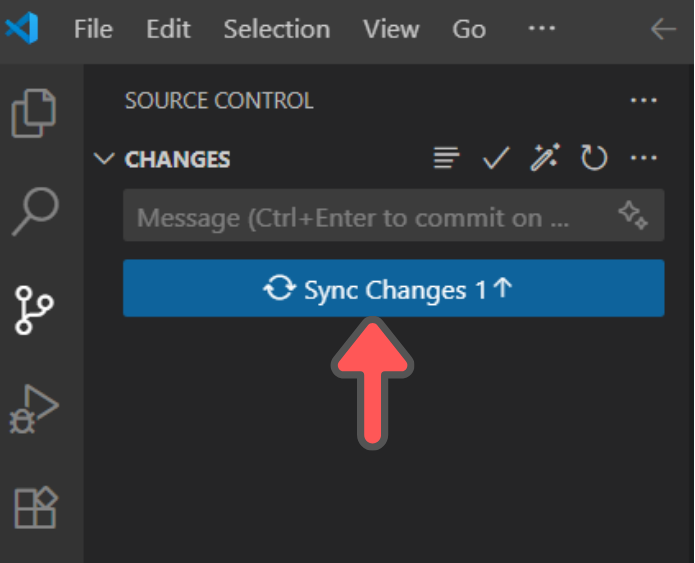
Push is the Git action that copies your new commits from the local repository on your computer to the remote repository, which in our case is cp115-class-repo. Although the button shows Sync, behind the scene what it will do is Push and Pull.
Now go back to your GitHub account in the browser. You should see that the repository has been updated with the commit message that you have added.
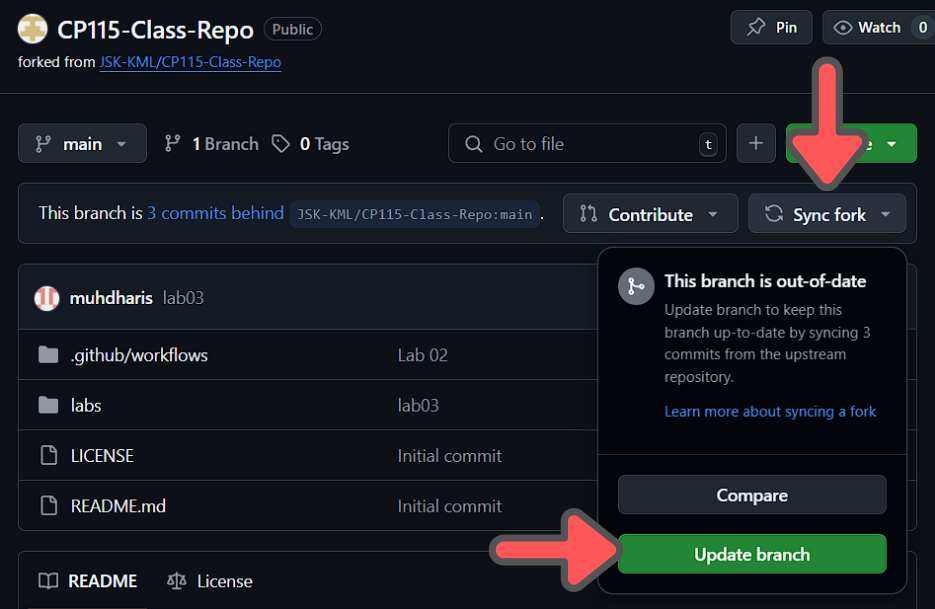
Syncing Fork
Once you fork a project, your copy starts aging the moment the original (“up-stream”) repo receives new commits. Syncing a fork is the act of pulling those new commits into your fork so it stays current—and so your pull requests don’t conflict with code that has already moved on.
To make sure your repository is up to date, go to you GitHub account and click Sync Fork and then choose Update branch.
Recap
Congrats! You've just navigated your first GitHub workflow. Here's a quick recap:
Fork: make a personal copy of any GitHub repository in your own account.Clone: bring that repository down to your computer, including its full history.gh auth login: authenticate your machine with GitHub so you can push and pull without entering credentials each time.Commit: record your local edits as a named snapshot with a clear message.Push: upload your committed snapshots from your machine to your GitHub repo.Sync Fork: pull in changes from the original project so your fork stays current.