Lab 07: Python Development Environment and Testing
Pull and Update in VS Code
This lab will guide you through setting up a professional Python development environment using virtual environments, testing with pytest, and automating tests with GitHub Actions. These are essential skills for writing maintainable and reliable Python code.
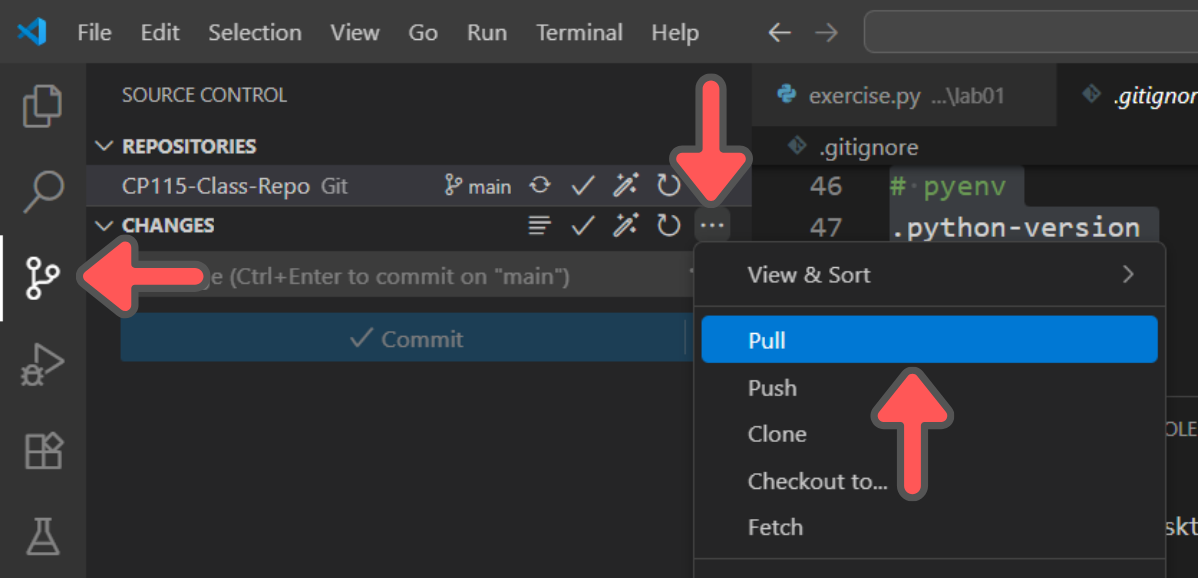
Before starting any lab, you need to make sure that the repo in your GitHub is the latest one. Sync the repo if the upstream repo have been updated.
Once the online repo is in-sync, bring those changes down to your PC by clicking Source Control and then ... beside Changes and click Pull.
Python Virtual Environments
Understanding Virtual Environments
A virtual environment in Python is like having a separate, isolated workspace for each of your projects. Think of it as having different toolboxes for different jobs.
When you install Python packages globally on your computer, they can sometimes conflict with each other. Different projects might need different versions of the same package, or installing a new package might break something in an existing project.
Virtual environments solve this problem by creating isolated Python environments where each project can have its own set of packages and dependencies, without affecting other projects or your system Python installation.
Creating Your First Virtual Environment
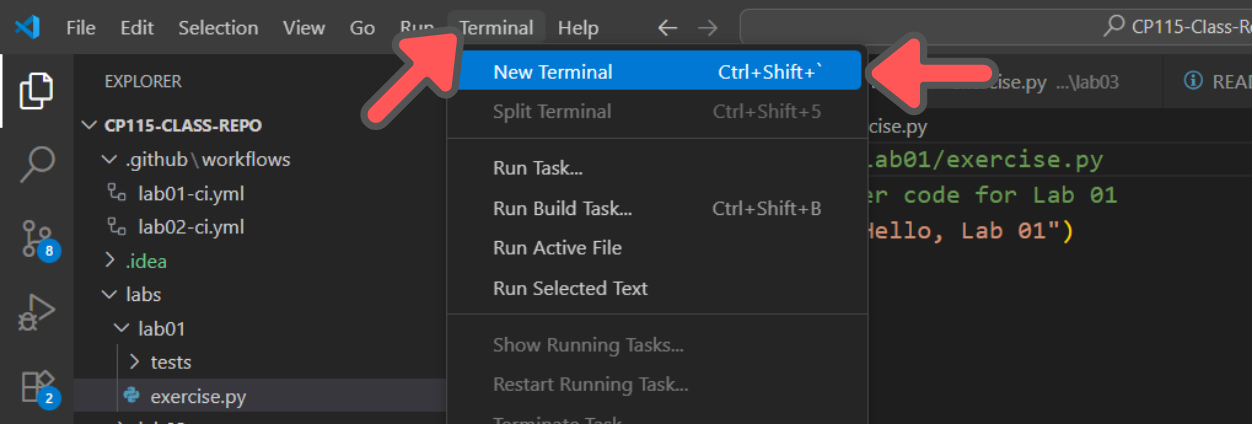
Launch VS Code and open your CP115-Class-Repo project. Open the terminal in VS Code by clicking Terminal and then New Terminal.
Make sure you're in the root directory of your CP115-Class-Repo. You should see folders like labs, LICENSE, and README.md in your current directory.
Now create a virtual environment using Python's built-in venv module. Type the following command:
python -m venv cp115_envThis creates a new directory called cp115_env that contains your isolated Python environment. The python -m venv command tells Python to run the venv module and create a new virtual environment in the specified directory.
You should see a new folder called cp115_env appear in your repository root directory. This folder contains a complete Python installation that's separate from your system Python.
Activating the Virtual Environment
Creating the virtual environment is just the first step. To actually use it, you need to activate it. Run the command below.
cp115_env\Scripts\activateAfter activation, you should see (cp115_env) appear at the beginning of your terminal prompt. This indicates that your virtual environment is active and any Python commands you run will use this isolated environment.

Testing Your Virtual Environment
Let's verify that your virtual environment is working correctly. With the virtual environment activated, type:
python --versionThis should show your Python version.
Creating a Simple Python Program
Create a new file called test_virtual_env.py in the /labs/lab07/ directory. Copy and paste this code.
student_name = "Your Name"
student_id = "Your ID"
course_code = "CP115"

print(student_name)
print(student_id)
print(course_code)
Run this program to make sure it works:
Deactivating the Virtual Environment
When you're done working in your virtual environment, you can deactivate it by simply typing:
deactivateThe (cp115_env) prefix should disappear from your terminal prompt, indicating that you're back to using your system Python installation.
TIP
Always activate your virtual environment before working on your project, and deactivate it when you're done. This ensures you're working in the correct, isolated environment.
Testing Python Code in VS Code
Installing the Python Test Explorer Extension
Testing is a crucial part of professional software development. It helps you verify that your code works correctly and continues to work as you make changes. VS Code has excellent support for Python testing through extensions.
Open VS Code and go to the Extensions panel by clicking the Extensions icon in the sidebar
Search for "Python Test Explorer" and install the extension by Little Fox Team. This extension provides a graphical interface for running and managing Python tests.
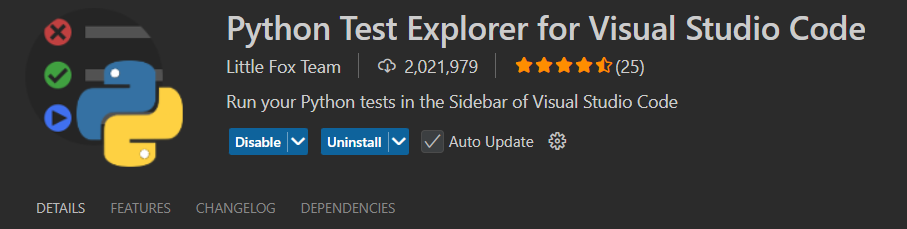
Also make sure you have the Python extension by Microsoft installed from Lab 1
Installing pytest
pytest is the most popular testing framework for Python. It makes writing and running tests simple and intuitive. First, make sure your virtual environment is activated:
cp115_env\Scripts\activateYou should see (cp115_env) in your terminal prompt. Now install pytest:
python -m pip install pytestThis installs pytest only in your virtual environment, not globally on your system. This is exactly what we want - each project can have its own version of pytest.
Set Up Python Test Extension
On the sidebar, click the Flask symbol and then click Configure Python Test
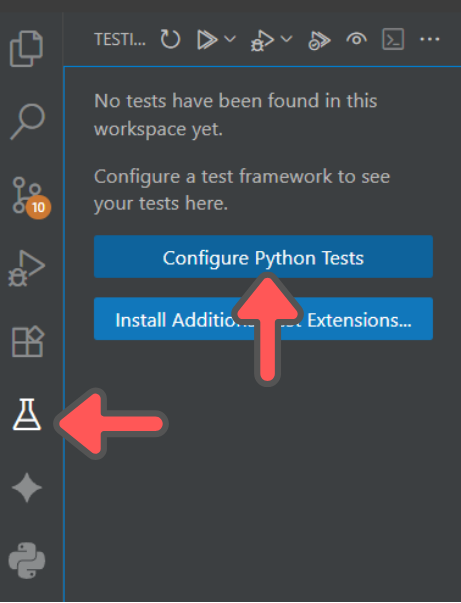
On the top bar, choose Pytest

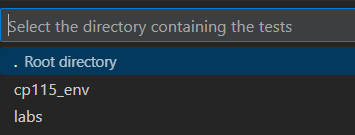
Next, choose Root Directory
Running Tests in VS Code
Once configured, you should see a new Testing panel in VS Code's sidebar. Click on the Testing icon (it looks like a flask) to open the test explorer.
In the Testing panel, you should see your test file and the individual test functions. You can:
- Run all tests by clicking the play button at the top
- Run individual tests by clicking the play button next to each test
- View test results with green checkmarks for passing tests and red X's for failing tests.
Configuring .gitignore for Python Virtual Environments
Understanding .gitignore
A .gitignore file tells Git which files and folders to ignore when tracking changes in your repository. This is essential because some files should never be committed to version control, such as:
- Virtual environments (they're large and machine-specific)
- Temporary files created by your operating system
- IDE configuration files that are personal preferences
- Cache files generated by Python
Think of .gitignore as a list of "don't track these files" instructions for Git.
Why Ignore Virtual Environments?
Virtual environments like cp115_env should never be committed to your repository because:
- Size: They contain thousands of files and can be hundreds of megabytes
- Machine-specific: They contain absolute paths specific to your computer
- Platform differences: Virtual environments differ between Windows, Mac, and Linux
Adding Virtual Environment to .gitignore
Open the .gitignore file in the root of your repository.
# Python Virtual Environments
cp115_env/
venv/
env/
.env/
Verifying .gitignore Works
After adding the virtual environment to .gitignore, check that Git is ignoring it:
Look into the sidebar for Source Control, and you should not see cp115_env and all of its content as something you can commit.
If you do see it, make sure:
- The
.gitignorefile is in the root directory of your repository - The path
cp115_env/is correctly spelled in.gitignore
F-Strings
Understanding F-Strings
In Lab 6, you learned how to display text using string concatenation with the + operator. While this works, Python has a more modern and easier way called f-strings (formatted string literals).
F-strings let you put variables directly inside strings, making your code cleaner and easier to read.
Comparing Old vs New Way
Let's see the difference between string concatenation and f-strings. Open your exercise.py file in /labs/lab07/ and try both approaches:
# Old way using string concatenation (from Lab 06)
student_name = "Ali"
age = 20
grade = 85.5

print("Student: " + student_name)
print("Age: " + str(age))
print("Grade: " + str(grade) + "%")# New way using f-strings
student_name = "Ali"
age = 20
grade = 85.5
print(f"Student: {student_name}")
print(f"Age: {age}")
print(f"Grade: {grade}%")Output (both produce the same result):
Student: Ali
Age: 20
Grade: 85.5%
How F-Strings Work
F-strings start with the letter f before the opening quote. Inside the string, you put variables inside curly braces {}.
name = "Sarah"
score = 92

# The f tells Python this is an f-string
# The {} tells Python to put the variable value here
message = f"Hello {name}, your score is {score}"
print(message)
Output:
Hello Sarah, your score is 92F-String Exercise Task
Create a file called exercise1.py. Practice using f-strings by rewriting these string concatenation examples:
# Convert these to f-strings
product_name = "Laptop"
price = 1299.99
quantity = 2
total = price * quantity

# Old way (convert these to f-strings)
print("Product: " + product_name)
print("Price: $" + str(price))
print("Quantity: " + str(quantity))
print("Total: $" + str(total))
Your task: Rewrite the print() statements using f-strings instead of string concatenation.
More Import Techniques
Review: Basic Imports from Lab 05
In Lab 05, you learned basic import statements:
import math
import random

# Using the modules
result = math.sqrt(25)
number = random.randint(1, 10)
Creating and Importing Your Own Code
Now let's learn how to create your own Python files and import them, just like you import math or random. This is very useful for organizing your code and reusing it in different programs.
Creating Your Own Module
A module is just a Python file that contains variables, calculations, or any code you want to reuse. Let's create a simple module.
First, create a file called my_data.py:
# my_data.py
# This is your own module with useful data

# Student information
student_name = "Ali Rahman"
student_age = 20
student_grade = 85

# Course information
course_code = "CP115"
course_name = "Python Programming"
total_students = 25

# Calculations
grade_percentage = student_grade / 100
remaining_students = total_students - 1

# Text processing
name_upper = student_name.upper()
name_length = len(student_name)
Importing Your Own Module
Now create another file called use_my_data.py that imports your module:
# use_my_data.py
import my_data

# Use variables from your own module
print("=== Using My Own Module ===")
print(f"Student: {my_data.student_name}")
print(f"Age: {my_data.student_age}")
print(f"Grade: {my_data.student_grade}%")
print(f"Course: {my_data.course_code} - {my_data.course_name}")
print(f"Name in UPPERCASE: {my_data.name_upper}")
print(f"Name length: {my_data.name_length} characters")
Output:
=== Using My Own Module ===
Student: Ali Rahman
Age: 20
Grade: 85%
Course: CP115 - Python Programming
Name in UPPERCASE: ALI RAHMAN
Name length: 10 characters
Import Exercise Task
Create a folder called exercise2 and practice creating and importing your own module:
- In the
exercise2folder, create a file calledshopping_data.pywith:- Product name, price, and quantity variables
- Calculate total cost
- In the same folder, create
exercise2.pythat importsshopping_dataand displays the information using f-strings
Combining F-Strings with Your Own Imports Task
Create a folder called exercise3 in /labs/lab07.
In the
exercise3folder, create a file calledschool_data.pywith:- Student information variables (name, student ID, age)
- Course information variables (course code, course name)
- Import
randommodule and generate two random scores (70-95 and 75-100) - Calculate total score by adding the two scores
- String operations on student name (upper, lower, length)
- Import
mathmodule and calculate square root of total score
In the same folder, create
exercise3.pythat importsschool_dataand uses f-strings to display all the information in a formatted report
Exercise 4: Restaurant Menu System Task
Create a folder called exercise4 in /labs/lab07.
Part A: In the exercise4 folder, create a file called menu_data.py with the following:
- Import the
randommodule - Create variables for:
- Restaurant name (your choice)
- Restaurant location
- Three menu items with names only (no prices or calculations)
- Use string operations to create:
- Restaurant name in uppercase
- Restaurant name in lowercase
- Length of the location name
- Use random to generate:
- A daily special number (1, 2, or 3)
- A customer number (between 100-999)
Part B: In the same folder, create exercise4.py that:
- Imports your
menu_datamodule - Uses f-strings to display:
- Welcome message with restaurant name
- Customer number
- Complete menu with all items
- Today's special (based on the random number)
Exercise 5: Personal Information Manager Task
Create a folder called exercise5in /labs/lab07.
Part A: In the exercise5 folder, create personal_data.py with:
- Import
randomandmathmodules - Personal information variables:
- Full name, age, height (cm), weight (kg)
- Phone number, email address
- Street address, city, postcode
- String operations:
- Full name in UPPERCASE and lowercase
- Length of full name
- City name in UPPERCASE
- Full address (combine street + city + postcode)
- Length of full address
Part B: In the same folder, create exercise5.py that:
- Imports your
personal_datamodule - Uses f-strings to display a comprehensive profile with:
- Basic personal information section
- String processing results
- Address information sections