Lab 04 (Supplementary) : Setting Up a New PC
Why This Lab Exists
We have moved to a new lab, which means you are now sitting in front of a fresh computer that has never seen your work before. None of the tools are installed, you are not logged in to GitHub, and your code is not on this PC yet.
The good news: you do not start from zero. Back in Lab 01 you already:
- created your GitHub account, and
- forked the
CP115-Class-Repointo your own account.
Those two things live on the GitHub web server, not on any single computer, so they are still yours. You do not need to create a new account and you do not need to fork again.
What you do need to do on this new PC is:
- Install the tools again (Git, VS Code, the Python extension, Flowgorithm, GitHub CLI).
- Log in to GitHub from the terminal.
- Clone your existing fork down to this computer.
- Confirm everything works.
NOTE
This lab is a setup lab, not new material. Once you finish it you will be ready to continue with the actual Lab 04 - Selection in Flowgorithm. Nothing here replaces Lab 04, it only gets your new PC ready for it.
Step 1: Install the Tools
Follow the Installation guide to install each tool. You have done this before on the old PC, so it should be quick this time. Install them in this order:
- Git — installation steps
- VS Code — installation steps
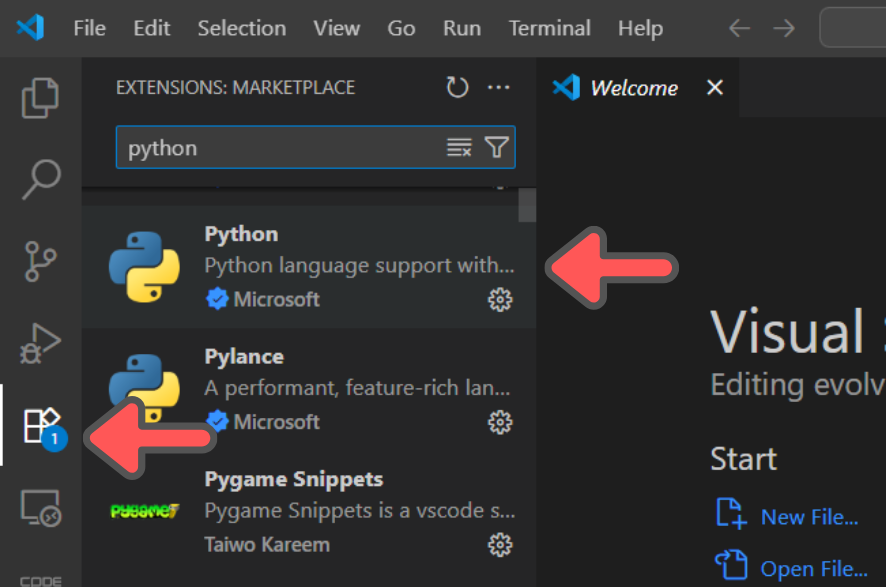
- The Python extension by Microsoft — open the
Extensionspanel in VS Code and install it, exactly as in Lab 01. - Flowgorithm — installation steps
REMINDER
Do not skip the Python extension. Without it, VS Code will not highlight your code, autocomplete, or run Python files properly.
Step 2: Prepare Your Workspace Folder
Just like the first time, make a home for your work on this PC so your files are easy to find.
Task- Go to the Desktop.
- Right-click an empty area and choose
New→Folder. - Name it after yourself, for example
aiman-cp115.
Then open it in VS Code:
- Open VS Code.
- Click
File→Open Folder.... - Select the folder you just made and click
Select Folder.
TIP
You can also right-click the folder on the Desktop and choose Open with Code.
Step 3: Install and Log In to GitHub CLI
This new PC does not know who you are yet. We use GitHub CLI (gh) to authenticate so that cloning, pushing, and pulling all work without typing your password every time.
Open a terminal in VS Code with Terminal → New Terminal.
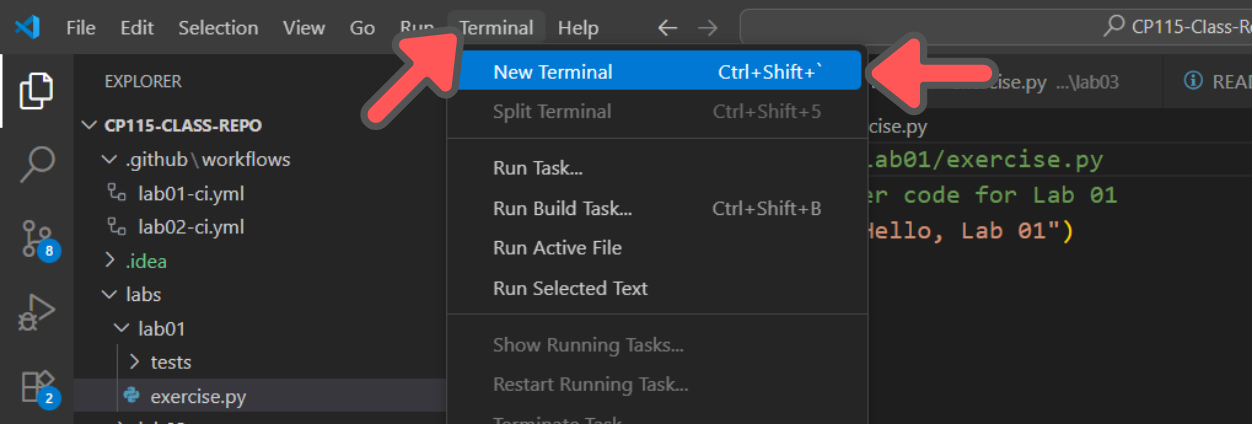
Install GitHub CLI with winget:
winget install --id GitHub.cliClose and reopen the terminal, then verify it installed:
gh --versionYou should see a version number.
Log In as Yourself
Because this is a shared lab PC, always check first whether someone is already logged in:
gh auth statusIf it shows someone else's account, log them out before logging in as yourself:
gh auth logoutNow log in:
gh auth loginFollow the prompts:
- Select GitHub.com
- Select HTTPS
- Choose Login with a web browser
- Copy the one-time code, press Enter to open the browser, paste the code, and authorise the app
Confirm you are in:
gh auth statusYou should see your own username.
Set Up Your Identity
Tell Git who you are on this PC so your commits are recorded under your name. Replace USERNAME and EMAIL with your real GitHub username and email:
git config --global user.name  "USERNAME"
git config --global user.email "EMAIL"
Step 4: Sync Your Fork
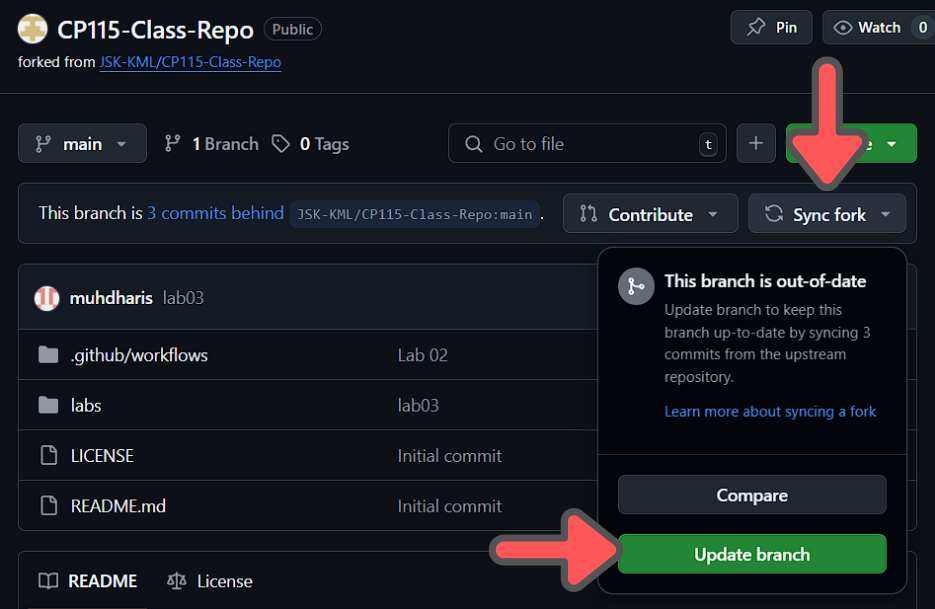
Your fork may be behind the class repo if the upstream repo was updated while you were away. Bring it up to date before you clone, so the copy you download onto this PC is already the latest version.
Sync your fork on the GitHub website: open your fork, click Sync Fork, then Update branch.
Step 5: Clone Your Existing Fork
Your fork already exists on GitHub from Lab 01. We are not forking again. We only need to bring that fork down to this new computer, and that is exactly what cloning does. Because you just synced it, the clone will already contain the latest work, so there is no need to pull afterwards.
On GitHub, open your own fork of CP115-Class-Repo, click the green Code button, and copy the link.
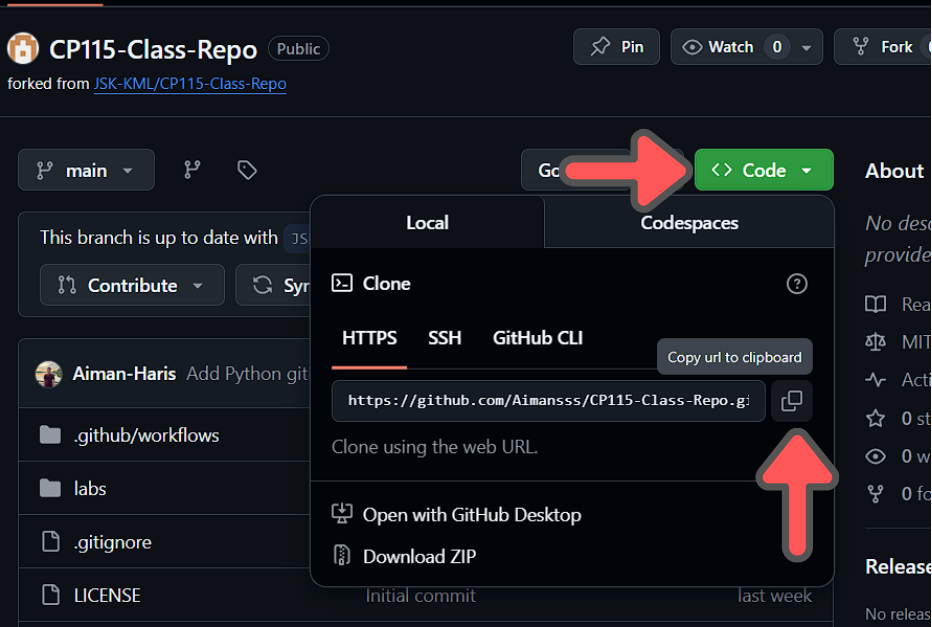
Back in VS Code, make sure the terminal is inside your workspace folder, then clone using the link you copied (replace it with your own):
git clone https://github.com/YOUR-USERNAME/CP115-Class-Repo.gitPress Enter and Git downloads a full copy of your repository into a new folder.
REMINDER
Make sure you clone your own fork, not the original JSK-KML/CP115-Class-Repo and not a classmate's. Since many students share this PC, double-check the link points to YOUR-USERNAME before you clone.
Checklist Before You Continue
- Git, VS Code, the Python extension, and Flowgorithm are installed on this PC.
- You are logged in to GitHub in the terminal as yourself (
gh auth statusshows your username). - You have synced your fork on GitHub.
- You have cloned your own fork onto this computer.
Once every box is ticked, your new PC is ready. You can now move on to the actual Lab 04 - Selection in Flowgorithm.
Before You Leave the Shared PC
This is a shared PC. Log out so the next student does not accidentally push to your repository:
gh auth logoutREMINDER
Always run gh auth logout before you leave. If you stay logged in, the next student using this PC could accidentally push their work to your account.